iOS 앱 배포 자동화를 위한 Fastlane 설치 및 구성
 Jason
Jason
이번 포스팅은 “GitLab과 Fastlane으로 iOS 앱 빌드 및 배포 자동화하기” 시리즈의 두 번째 글로, GitLab CI/CD 파이프라인을 구성하기 전에, Fastlane으로 Lint, Test, TestFlight 배포 등 각 단계별로 Lane을 정의하는 방법에 대해 알아보겠습니다.
이번 글에서는 Fastlane을 설치하고 기본 설정을 한 후, 필요한 환경 변수를 추가하고 각 단계별 Lane을 정의하는 내용을 다룹니다. 또한 match 방식으로 코드 사이닝 하는 방법도 설명합니다.
Fastlane 소개
Fastlane은 Android 및 iOS 배포를 단순화하는 것을 목표로 하는 오픈 소스 플랫폼입니다. Fastlane을 사용하면 스크린샷 생성, 코드사이닝, 빌드 번호 올리기, 애플리케이션 릴리스와 같은 개발 및 릴리스 워크플로의 모든 지루한 작업을 자동화할 수 있습니다.
Fastlane 설치
Fastlane은 여러 가지 방법으로 설치할 수 있으나, Bundler와 Gemfile을 사용하여 설치하는 것이 좋습니다.
앱을 빌드하고 업로드하는 데 문제가 발생하지 않도록, 로케일(Locale) 관련 환경변수를 추가합니다.
Terminal 또는 iTerm을 열고, ~/.bashrc, ~/.bash_profile, ~/.profile 또는 ~/.zshrc에 아래 환경 변수를 추가합니다.
export LC_ALL=ko_KR.UTF-8
export LANG=ko_KR.UTF-8
아래 명령을 실행하여 적용합니다.
source ~/.zshrc
Xcode 프로젝트 디렉토리로 이동하여 Gemfile 파일을 생성하고 아래 내용을 작성합니다.
source "https://rubygems.org"

gem "fastlane"
아래 명령을 실행하면 ./vendor/bundle 경로에 fastlane과 필요한 Ruby gem(라이브러리)이 설치되고, 버전 컨트롤을 위한 ./Gemfile.lock이 생성됩니다.
bundle install --path vendor/bundle
fastlane 버전을 확인합니다.
$ fastlane --version
fastlane installation at path:
/Library/Ruby/Gems/2.6.0/gems/fastlane-2.206.2/bin/fastlane
-----------------------------
[✔] 🚀
fastlane 2.206.2
Fastlane 기본 설정
Lint, Test, TestFlight 배포 등 각 단계를 Lane으로 정의하기 전에, 구성 정보를 정의하는 Fastfile 파일과 Apple ID 또는 애플리케이션 Bundle Identifier와 같은 앱 관련 정보를 저장하는 Appfile 파일을 생성해야 합니다.
fastlane init 명령을 실행한 후, 빠르게 진행하게 위해 4를 선택하고 Enter 키를 누릅니다.
$ fastlane init
[✔] 🚀
...
[✔] Looking for iOS and Android projects in current directory...
[14:32:32]: Created new folder './fastlane'.
[14:32:32]: Detected an iOS/macOS project in the current directory: 'MyFirstApp.xcodeproj'
[14:32:32]: -----------------------------
[14:32:32]: --- Welcome to fastlane 🚀 ---
[14:32:32]: -----------------------------
[14:32:32]: fastlane can help you with all kinds of automation for your mobile app
[14:32:32]: We recommend automating one task first, and then gradually automating more over time
[14:32:32]: What would you like to use fastlane for?
1. 📸 Automate screenshots
2. 👩✈️ Automate beta distribution to TestFlight
3. 🚀 Automate App Store distribution
4. 🛠 Manual setup - manually setup your project to automate your tasks
? 4
이후, 프롬프트가 나오면 계속해서 Enter 키를 누릅니다.
fastlane 폴더에 Appfile 및 Fastfile 파일이 생성됩니다.
fastlane/Appfile 파일에서 앱의 Bundle ID와 Apple ID으로 수정합니다. 여러 팀에 속해 있으면 Developer Portal 및 App Store Connect의 Team ID를 추가합니다.
app_identifier("net.infograb.MyFirstApp") # The bundle identifier of your app
apple_id("your_account@company.com") # Your Apple email address

itc_team_id("123456789") # App Store Connect Team ID
team_id("Q2CBPJ58CA") # Developer Portal Team ID

# For more information about the Appfile, see:
#     https://docs.fastlane.tools/advanced/#appfile
Pod Install Lane
첫 번째로 구성할 Lane은 프로젝트에서 사용하는 의존성 라이브러리를 설치하기 위한 구성입니다.
Swift 스타일 및 코딩 컨벤션을 적용하는 도구인 SwiftLint를 CocoaPods를 통해 설치합니다.
CocoaPods는 Swift 및 Objective-C Cocoa 프로젝트에 많이 사용되는 의존성 매니저(dependency manager)입니다. 90,000개 이상의 라이브러리가 있으며 300만 개 이상의 앱에서 사용됩니다.
-
pod init명령을 실행하면, 프로젝트 루트 디렉토리에Podfile파일이 생성됩니다. -
Podfile파일에pod 'SwiftLint'을 추가합니다.ruby# Uncomment the next line to define a global platform for your project # platform :ios, '9.0' target 'MyFirstApp' do # Comment the next line if you don't want to use dynamic frameworks use_frameworks! # Pods for MyFirstApp pod 'SwiftLint' target 'MyFirstAppTests' do inherit! :search_paths # Pods for testing end target 'MyFirstAppUITests' do # Pods for testing end end -
fastlane/Fastfile파일을 아래와 같이 수정합니다.ruby# This file contains the fastlane.tools configuration # You can find the documentation at https://docs.fastlane.tools # # For a list of all available actions, check out # # https://docs.fastlane.tools/actions # # For a list of all available plugins, check out # # https://docs.fastlane.tools/plugins/available-plugins # # Uncomment the line if you want fastlane to automatically update itself # update_fastlane default_platform(:ios) platform :ios do desc "Runs `pod install`" puts "Runs `pod install`" lane :pod_install do cocoapods( clean_install: true, podfile: "./Podfile" ) end end -
Gemfile파일에gem "cocoapods"을 추가합니다.rubysource "https://rubygems.org" gem "fastlane" gem "cocoapods" -
아래 명령을 실행하여
cocoapods를 설치합니다.bashbundle install --path vendor/bundle -
bundle exec fastlane pod_install명령으로 Lane을 실행합니다.bash$ bundle exec fastlane pod_install [✔] 🚀 ... [14:37:18]: ------------------------------ [14:37:18]: --- Step: default_platform --- [14:37:18]: ------------------------------ [14:37:18]: Runs `pod install` [14:37:18]: Driving the lane 'ios pod_install' 🚀 [14:37:18]: ----------------------- [14:37:18]: --- Step: cocoapods --- [14:37:18]: ----------------------- [14:37:19]: $ cd '.' && bundle exec pod install --clean-install [14:37:19]: ▸ Analyzing dependencies [14:37:19]: ▸ Downloading dependencies [14:37:19]: ▸ Installing SwiftLint (0.47.1) [14:37:19]: ▸ Generating Pods project [14:37:19]: ▸ Integrating client project [14:37:19]: ▸ Pod installation complete! There is 1 dependency from the Podfile and 1 total pod installed. [14:37:19]: ▸ [!] Automatically assigning platform `iOS` with version `15.4` on target `HelloWorld` because no platform was specified. Please specify a platform for this target in your Podfile. See `https://guides.cocoapods.org/syntax/podfile.html#platform`. +------+------------------+-------------+ | fastlane summary | +------+------------------+-------------+ | Step | Action | Time (in s) | +------+------------------+-------------+ | 1 | default_platform | 0 | | 2 | cocoapods | 1 | +------+------------------+-------------+ [14:37:19]: fastlane.tools finished successfully 🎉 -
Pods디렉토리가 생성되고 의존성 라이브러리들이 설치됩니다.
Lint Lane
이전 단계에서 설치한 SwiftLint로 Swift 스타일 및 코딩 컨벤션을 체크하는 Lane을 구성합니다.
-
Xcode 프로젝트의 루트에
.swiftlint.yml파일을 생성하고 아래 내용을 추가합니다.yamlexcluded: # paths to ignore during linting. Takes precedence over `included`. - Pods - vendor -
fastlane/Fastfile파일에 아래 내용을 추가합니다.ruby... desc "Run swift code validation using SwiftLint" puts "Run swift code validation using SwiftLint" lane :lint do swiftlint( mode: :lint, ignore_exit_status: true, raise_if_swiftlint_error: true, executable: "./Pods/SwiftLint/swiftlint" ) end ... -
bundle exec fastlane lint명령으로 Lint Lane을 실행합니다.bash$ bundle exec fastlane lint [✔] 🚀 ... [14:39:34]: ------------------------------ [14:39:34]: --- Step: default_platform --- [14:39:34]: ------------------------------ [14:39:34]: Driving the lane 'ios lint' 🚀 [14:39:34]: ----------------------- [14:39:34]: --- Step: swiftlint --- [14:39:34]: ----------------------- [14:39:34]: $ ./Pods/SwiftLint/swiftlint lint [14:39:34]: ▸ Linting Swift files in current working directory [14:39:34]: ▸ Linting 'MyFirstAppApp.swift' (1/5) [14:39:34]: ▸ Linting 'MyFirstAppUITests.swift' (2/5) [14:39:34]: ▸ Linting 'ContentView.swift' (3/5) [14:39:34]: ▸ Linting 'MyFirstAppUITestsLaunchTests.swift' (4/5) [14:39:34]: ▸ Linting 'MyFirstAppTests.swift' (5/5) [14:39:34]: ▸ /Users/jason/Workspace/MyFirstApp/MyFirstAppUITests/MyFirstAppUITests.swift:18:1: warning: Line Length Violation: Line should be 120 characters or less: currently 182 characters (line_length) [14:39:34]: ▸ /Users/jason/Workspace/MyFirstApp/MyFirstAppTests/MyFirstAppTests.swift:26:1: warning: Line Length Violation: Line should be 120 characters or less: currently 130 characters (line_length) [14:39:34]: ▸ Done linting! Found 2 violations, 0 serious in 5 files. +------+------------------+-------------+ | fastlane summary | +------+------------------+-------------+ | Step | Action | Time (in s) | +------+------------------+-------------+ | 1 | default_platform | 0 | | 2 | swiftlint | 0 | +------+------------------+-------------+ [14:39:34]: fastlane.tools finished successfully 🎉
Test Lane
단위 테스트 또는 UI 테스트를 수행하는 Test Lane을 구성합니다.
-
fastlane/Fastfile파일에 아래 내용을 추가합니다.ruby... desc "Runs all the tests" puts "Runs all the tests" lane :tests do run_tests( workspace: "MyFirstApp.xcworkspace", scheme: "MyFirstApp", devices: ["iPhone 13"], skip_build: true ) end ... -
bundle exec fastlane tests명령으로 Test Lane을 실행합니다.bash$ bundle exec fastlane tests [✔] 🚀 ... [14:43:25]: ------------------------------ [14:43:25]: --- Step: default_platform --- [14:43:25]: ------------------------------ [14:43:25]: Runs `pod install` [14:43:25]: Run swift code validation using SwiftLint [14:43:25]: Runs all the tests [14:43:25]: Driving the lane 'ios tests' 🚀 [14:43:25]: ----------------------- [14:43:25]: --- Step: run_tests --- [14:43:25]: ----------------------- [14:43:26]: Resolving Swift Package Manager dependencies... [14:43:26]: $ xcodebuild -resolvePackageDependencies -workspace MyFirstApp.xcworkspace -scheme MyFirstApp ... [14:45:13]: ▸ Test Succeeded +--------------------+-------------------+ | Test Results | +--------------------+-------------------+ | Number of tests | 5 (and 3 retries) | | Number of failures | 0 | +--------------------+-------------------+ +------+------------------+-------------+ | fastlane summary | +------+------------------+-------------+ | Step | Action | Time (in s) | +------+------------------+-------------+ | 1 | default_platform | 0 | | 2 | run_tests | 111 | +------+------------------+-------------+ [14:45:16]: fastlane.tools finished successfully 🎉
Code signing
자동화된 설정으로 코드 사이닝 하는 방법은 match를 사용하는 것과 cert 및 sigh를 사용하는 방법이 있습니다. cert/sigh 방식은 기존 인증서를 사용하여 코드 사이닝 하는 것으로 GitLab CI/CD 파이프라인으로 자동화하려면 Runner에 인증서를 수동으로 설치해야 하는 번거로움이 있습니다.
여기서는 match를 사용하여 코드 사이닝 하는 방법을 설명합니다. match를 사용하면 개인 키와 인증서를 Git 저장소에 저장하여 머신 간에 동기화할 수 있습니다. 이를 통해 새로운 팀 구성원을 쉽게 온보딩 하고 새로운 Mac 시스템을 설정할 수 있습니다.
match를 사용하려면 우선 Git 저장소가 필요하므로, GitLab 프로젝트를 생성한 후, 소스 코드를 Commit 하고 Push 합니다.
다음을 수행하여 GitLab 프로젝트를 생성합니다.
- 그룹 페이지에서 New project 버튼을 클릭합니다.
- Create new project 페이지에서 Create blank project를 클릭합니다.
- Create blank project 페이지에서 아래 항목을 입력 또는 선택하고 Create project 버튼을 클릭합니다.
- Project name : 프로젝트 이름 입력 (예:
iOS with Fastlane) - Visibility Level : Private 선택
- Initialize repository with a README : 체크 해제 (체크를 하게 되면
git push할 때 번거로운 추가 작업을 해야 합니다.)
로컬 저장소를 생성(초기화)하고 설정한 후, 소스를 커밋하고 원격 저장소인 GitLab에 git push 하여 업로드합니다.
-
로컬 머신에 Git이 설치되어 있지 않으면, 설치하고 아래
git config명령을 실행하여 이름과 이메일을 설정해야 합니다.bashgit config --global user.name "<Your name>" # 본인의 이름으로 수정합니다. git config --global user.email "<Your email>" # 본인의 이메일로 수정합니다. -
git init --initial-branch=main명령을 실행하여 로컬 저장소를 생성(초기화)합니다. -
GitLab 프로젝트 페이지에서 Clone 버튼을 클릭한 후, Clone with HTTPS 주소를 복사하여 붙여 넣고 아래 명령을 완성하고 실행합니다.
bashgit remote add origin https://<GitLab_Domain>/<Group_Namespace>/ios-with-fastlane.git -
git config --list명령을 실행하면 아래와 유사한 Git 구성 정보를 확인할 수 있습니다.bashcredential.helper=osxkeychain user.name=<Your name> user.email=<Your email> ... core.repositoryformatversion=0 core.filemode=true core.bare=false core.logallrefupdates=true core.ignorecase=true core.precomposeunicode=true remote.origin.url=https://<GitLab_Domain>/<Group_Namespace>/ios-with-fastlane.git remote.origin.fetch=+refs/heads/*:refs/remotes/origin/* -
아래 명령을 실행하여
.gitignore파일을 생성합니다.bash$ curl -o .gitignore https://www.toptal.com/developers/gitignore/api/swift,cocoapods,fastlane % Total % Received % Xferd Average Speed Time Time Time Current Dload Upload Total Spent Left Speed 100 3290 100 3290 0 0 11826 0 --:--:-- --:--:-- --:--:-- 12095 -
.gitignore파일에 아래 내용을 추가합니다.## Ruby Bundler /.bundle/ /vendor/bundle -
git status명령을 실행하여 커밋할 파일 목록 중에 버전 관리가 필요 없는 디렉토리 또는 파일이 있으면,.gitignore파일에 추가합니다. -
다음과 같이 실행하여 커밋하고 원격 저장소에 Push 합니다.
bashgit add . git commit -m "Initial commit" git push -u origin main -
GitLab 프로젝트를 새로고침 하면 소스가 업로드된 것을 확인할 수 있습니다.
다음을 수행하면 인증서와 프로파일이 생성되고 Git 저장소에 업로드됩니다.
-
bundle exec fastlane match init명령을 실행한 후, 프롬프트에1을 입력하고 Enter 키를 누릅니다.bash$ bundle exec fastlane match init [✔] 🚀 ... [14:52:11]: fastlane match supports multiple storage modes, please select the one you want to use: 1. git 2. google_cloud 3. s3 ? 1 -
프로젝트의 Git URL을 입력하고 Enter 키를 누릅니다.
-
fastlane/Matchfile파일이 생성됩니다. -
fastlane/Matchfile파일을 아래와 같이 수정합니다.rubygit_url("https://<GitLab_Domain>/<Group_Namespace>/ios-with-fastlane.git") git_branch("main") storage_mode("git") type("appstore") # The default type, can be: appstore, adhoc, enterprise or development app_identifier("net.infograb.MyFirstApp") username("your_apple_id@company.com") # Your Apple Developer Portal username # For all available options run `fastlane match --help` # Remove the # in the beginning of the line to enable the other options # The docs are available on https://docs.fastlane.tools/actions/match -
bundle exec fastlane match appstore명령을 실행합니다. (이전에 생성한 인증서와 프로파일이 있으면 삭제 후 실행합니다.) -
Passphrase프롬프트가 나오면 입력하고 기록해 둡니다. (다음 단계에서MATCH_PASSWORD변수의 값으로 사용됩니다.)bash[14:53:02]: Checking out branch main... [14:53:02]: Enter the passphrase that should be used to encrypt/decrypt your certificates [14:53:02]: This passphrase is specific per repository and will be stored in your local keychain [14:53:02]: Make sure to remember the password, as you'll need it when you run match on a different machine [14:53:02]: Passphrase for Match storage: ******** [14:53:02]: Type passphrase again: ******** [14:53:02]: 🔓 Successfully decrypted certificates repo -
진행 중 사용할 팀 번호를 확인하는 프롬프트가 나오면 팀 번호를 선택합니다.
bash... Multiple teams found on the Developer Portal, please enter the number of the team you want to use: 1) 9876543210 "Your Compony Co., Ltd" (Company/Organization) 2) 1234567890 "Gildong Hong" (Individual) ... -
Apple Developer > Account > Certificates, IDs & Profiles에 접속한 후, Certificates 및 Profiles 페이지에서 인증서와 프로파일이 생성된 것을 확인할 수 있습니다.
-
로컬 머신에서 키체인 접근 > 로그인의 내 인증서 탭에 인증서가 추가된 것을 확인할 수 있습니다.
-
GitLab 프로젝트의 사이드 바에서 Repository > Commits을 선택하면,
[fastlane] Updated appstore and platform ios커밋 내역을 확인할 수 있습니다.
TestFlight Lane
다음을 수행하여 Personal access token을 생성합니다.
-
GitLab에서 우측 상단에 있는 아바타를 클릭하고 Edit profile을 선택합니다.
-
User Settings 페이지의 좌측 사이드 바에서 Access Tokens를 클릭합니다.
-
Token name 필드에 토큰의 이름을 입력합니다. (예:
match_git_clone_auth_token) -
Expiration date 필드에 만료 날짜를 선택합니다. (선택사항)
-
Select scopes에서
read_repository체크박스를 체크하고 Create personal access token 버튼을 클릭합니다. -
Your new personal access token 필드에 생성된 액세스 토큰이 표시됩니다.
-
Copy personal access token 아이콘을 클릭하여 복사하고, 액세스 토큰을 기록해 둡니다.
페이지를 나가거나 새로고침 하면 다시 액세스 할 수 없습니다.
Git 저장소에 저장된 인증서 및 프로비저닝 프로파일를 가져올 때 GitLab에 인증(Basic authentication)하기 위한 Base64 인코딩 된 키를 GitLab 계정과 이전 단계에서 생성한 Personal access token를 사용하여 생성합니다.
echo -n your_gitlab_username:your_personal_access_token | base64
아래는 실행한 예입니다.
$ echo -n jason:F7i-jNM8eRx8AVuTRxi7 | base64
amFzb246RjdpLWpOZVJ1VFJ4eE04OEFWaTc=
아래의 환경 변수를 추가합니다.
export TEMP_KEYCHAIN_NAME="fastlane"
export TEMP_KEYCHAIN_PASSWORD="abcd1234"
export MATCH_GIT_BASIC_AUTHORIZATION="amFzb246RjdpLWpOZVJ1VFJ4eE04OEFWaTc="
export MATCH_PASSWORD="1234abcd"
export API_ISSUER_ID="312de789-12d6-1234-5678-123ba54eb789"
export API_KEY_ID="AB9CDEFGH6"
export API_KEY_CONTENT="-----BEGIN PRIVATE KEY-----
MIGTAgEAMBM...
rn8ndgTU
-----END PRIVATE KEY-----"
Testflight에 앱을 업로드하는 Lane을 구성하고 실행합니다.
-
fastlane/Fastfile파일에 환경 변수, 임시 키체인 삭제, 생성 함수와 TestFlight Lane을 추가합니다.ruby... default_platform(:ios) KEYCHAIN_NAME = ENV["TEMP_KEYCHAIN_NAME"] KEYCHAIN_PASSWORD = ENV["TEMP_KEYCHAIN_PASSWORD"] GIT_BASIC_AUTHORIZATION = ENV["MATCH_GIT_BASIC_AUTHORIZATION"] ISSUER_ID = ENV["API_ISSUER_ID"] KEY_ID = ENV["API_KEY_ID"] KEY_CONTENT = ENV["API_KEY_CONTENT"] def delete_temp_keychain(name) delete_keychain( name: name ) if File.exist? File.expand_path("~/Library/Keychains/#{name}-db") end def create_temp_keychain(name, password) create_keychain( name: name, password: password, unlock: false, timeout: 0 ) end def ensure_temp_keychain(name, password) delete_temp_keychain(name) create_temp_keychain(name, password) end platform :ios do ... private_lane :code_signing do match( type:"appstore", readonly: true, git_basic_authorization: GIT_BASIC_AUTHORIZATION, keychain_name: KEYCHAIN_NAME, keychain_password: KEYCHAIN_PASSWORD ) end private_lane :get_api_key do app_store_connect_api_key( key_id: KEY_ID, issuer_id: ISSUER_ID, key_content: KEY_CONTENT, duration: 1200, in_house: false ) end private_lane :bump_build_number do |options| api_key = options[:api_key] version = get_version_number( xcodeproj: "MyFirstApp.xcodeproj", target: "MyFirstApp" ) puts "Version : #{version}" latest_build_number = latest_testflight_build_number( api_key: api_key, version: version, initial_build_number: 0 ) puts "Latest build number : #{latest_build_number}" increment_build_number( build_number: latest_build_number + 1, xcodeproj: "MyFirstApp.xcodeproj" ) end desc "Distribute app to TestFlight" puts "Distribute app to TestFlight" lane :distribute_testflight do ensure_temp_keychain(KEYCHAIN_NAME, KEYCHAIN_PASSWORD) code_signing api_key = get_api_key bump_build_number(api_key: api_key) build_app( workspace: "MyFirstApp.xcworkspace", scheme: "MyFirstApp", configuration: "Release", export_method: "app-store", output_directory: "build_output", clean: true ) upload_to_testflight( api_key: api_key, ipa: "./build_output/MyFirstApp.ipa", skip_waiting_for_build_processing: true ) delete_temp_keychain(KEYCHAIN_NAME) end ... -
bundle exec fastlane distribute_testflight명령으로 TestFlight Lane을 실행합니다. -
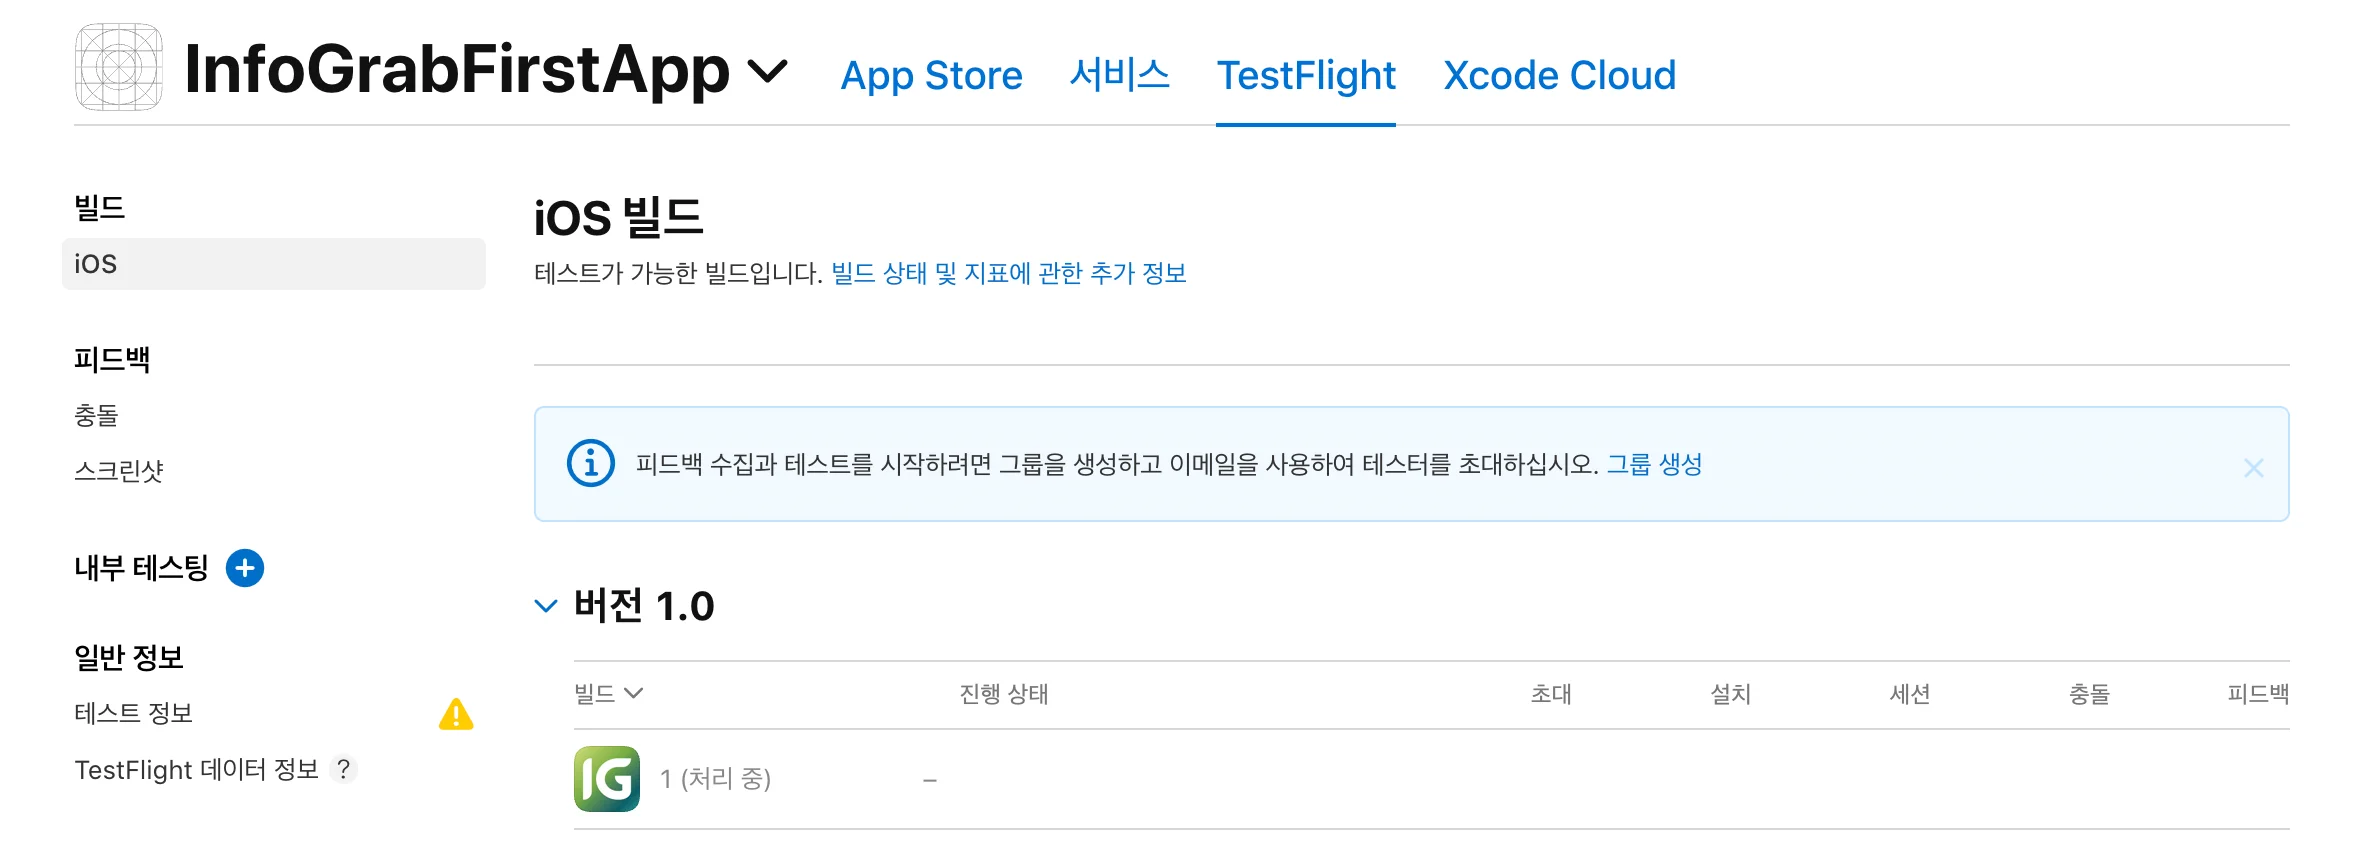
App Store Connect의 TestFlight에서 앱이 업로드된 것을 확인할 수 있습니다.
맺음말
지금까지 Fastlane에 대한 간단한 소개와 설치 및 구성하는 방법, match를 이용하여 인증서 및 프로파일을 생성하여 코드 사이닝 하고, Lint, Test, TestFlight 배포 Lane을 정의하는 방법을 알아보았습니다. 다음 글은 GitLab CI/CD 파이프라인을 구성하여 Fastlane의 각 Lane을 실행하는 내용으로, GitLab과 Fastlane으로 iOS 앱 빌드 및 배포 자동화하기 시리즈를 마무리하겠습니다.
사전 동의 없이 2차 가공 및 영리적인 이용을 금하며, 온·오프라인에 무단 전재 또는 유포할 수 없습니다.
Jason
DevOps Architect
DevOps 도입이 필요하신가요?
인포그랩 전문가가 맞춤 을 도와드립니다.
관련 글

iOS 앱 배포 자동화를 위한 GitLab CI/CD 구성
GitLab CI/CD는 모든 지속적 방법 (지속적 통합, 전달 및 배포)에 사용하는 GitLab의 기본 기능입니다. GitLab CI/CD를 사용하면 타사 애플리케이션이나 통합 없이 소프트웨어를 테스트, 빌드 및 게시할 수 있습니다. 이 글을 통해 iOS 앱을 개발하여 코딩 컨벤션 체크에서부터, 단위 테스트, 코드 사이닝, iOS 앱 빌드, TestFlight에 앱을 배포한 것에 이르는 일련의 과정을 자동화하는 GitLab CI/CD 파이프라인을 구성하는 방법을 상세하게 알 수 있습니다.
2022년 7월 29일
AWS EC2 Mac 인스턴스에 GitLab Runner 설치하기
iOS 앱을 개발하면서 코드사이닝, 버전 및 빌드 번호 변경, 테스트하여 TestFlight 및 App Store에 배포하는 일련의 과정은 번거로운 작업일 수 있습니다. Fastlane과 GitLab CI/CD 파이프라인을 사용하면 이러한 작업을 자동화할 수 있습니다. 개발자는 새로운 기능을 개발하거나 기존 기능을 개선한 후, 코드를 커밋하고 GitLab에 Push만 하면 됩니다. GitLab CI/CD 파이프라인이 개발자를 대신해 자동으로 빌드, 테스트하고 TestFlight 및 App Store에 앱을 배포하는 과정을 상세하게 알 수 있음
2022년 5월 31일

GitLab CI/CD 캐시\:\ 파이프라인 속도 향상하기
GitLab의 중요한 기능 중 하나는 코드 빌드, 테스트 및 배포 과정을 자동화할 수 있는 CI/CD 파이프라인입니다. 그러나 프로젝트가 커지면 Job 수, 단계 수, 스크립트 및 의존성 수 등 많은 요소로 인해 파이프라인이 느려질 수 있습니다. 느린 파이프라인은 개발 프로세스에 부정적인 영향을 미칠 수 있으며, 시장 진입 시간이 증가하고 귀중한 자원을 낭비할 수 있습니다. 이번 포스트에서는 GitLab 파이프라인 속도를 향상하는 데 사용할 수 있는 여러 방법과 그중 가장 간단하고 효과적인 방법인 GitLab CI/CD 캐시에 대해 알아보겠습니다.
2023년 2월 27일